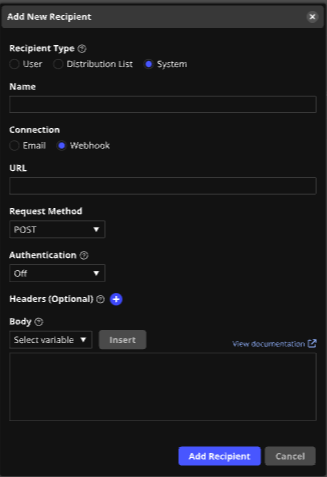
Webhook Support for Sensor Notifications
Webhooks allow interaction between web-based applications through the use of custom callbacks. The use of webhooks allows web applications to automatically communicate with other web-apps.
SysTrack supports webhooks for activated sensor notifications in addition to setting up email notifications.
Notifications can have both webhooks and email addresses.
When a sensor notification threshold is reached, SysTrack sends an HTTP request with information about the notification to a third party.
Multiple notifications can go to the same webhook and you can set up webhooks on a per notification basis. However, two webhooks cannot share the same name.
For information about integrating with Qualtrics, see Operational Pulse Integration with Qualtrics.
Set Up Webhooks in SysTrack
After you create a webhook, you can reuse it for subsequent notifications.
-
Add a recipient. See Sensor Notification Recipients.
-
In Recipient Type, select System and enter a name.
-
In Connection, click Webhook.
-
Enter the URL. This URL will come from the third-party system that is receiving the webhook.
-
In Request Method, select one of the following:
-
POST: creates a new resource in the third-party application where the webhook is being sent.
-
PUT: updates a resource in the third-party application where the webhook is being sent.
-
-
In Authentication, select one of the following options:
-
Off: The webhook is not authenticated.
-
Basic Auth: Enter the username and password associated with the third party system. Both username and password are required for this authentication method.
-
Signed Secret: Manually enter your own secret text or click Generate to automatically create one. This field is required for this authentication method.
The secret is what is passed in a webhook header so that the receiving system knows it is coming from a valid system.
IMPORTANT: The secret is only shown in the UI at this time. Make sure that you store the secret somewhere safe.
-
-
In Headers, select the plus sign to add multiple, unique headers. Headers are optional.
NOTE: If you select the Sensitive checkbox, when you save, the value for that header will not be shown in the interface again.
-
In Body, enter a custom template for the content of the webhook payload. A default JSON body template displays in this section for you to use as a starting point for the webhook body. For more information, see Sensor Notification Webhook Body Templates.
-
Click Add Recipient.

NOTE: The POST and PUT settings will depend on the third-party you integrate with.

For more information about using third-party applications and webhooks, see the following:
On This Page